
Introduction
Cabinet molding is an essential element in interior design that enhances the appearance and functionality of your cabinets. Whether you’re renovating your kitchen, bathroom, or any other space with cabinetry, cabinet molding offers a way to add a touch of elegance, cover gaps, and create a seamless look. This article will delve deep into cabinet molding installation, covering its types, benefits, installation tips, and more. By the end, you’ll thoroughly understand how to choose and implement cabinet molding in your home.
Cabinet Molding
Cabinet molding refers to the decorative trim added to the cabinets’ edges, tops, bottoms, or faces. It serves both functional and aesthetic purposes, transforming plain cabinets into eye-catching features of your home. Adding molding can create a cohesive look, making your cabinetry appear custom-built and integrated with the room’s architecture.
Molding is not a one-size-fits-all solution; it comes in various styles, shapes, and sizes, allowing you to tailor it to your needs and design preferences. From traditional to modern designs, cabinet molding can be adapted to suit any interior aesthetic.
Types of Cabinet Molding
Understanding the different types of cabinet molding is crucial when deciding which one is right for your home. Here are the most common types:
1. Crown Molding
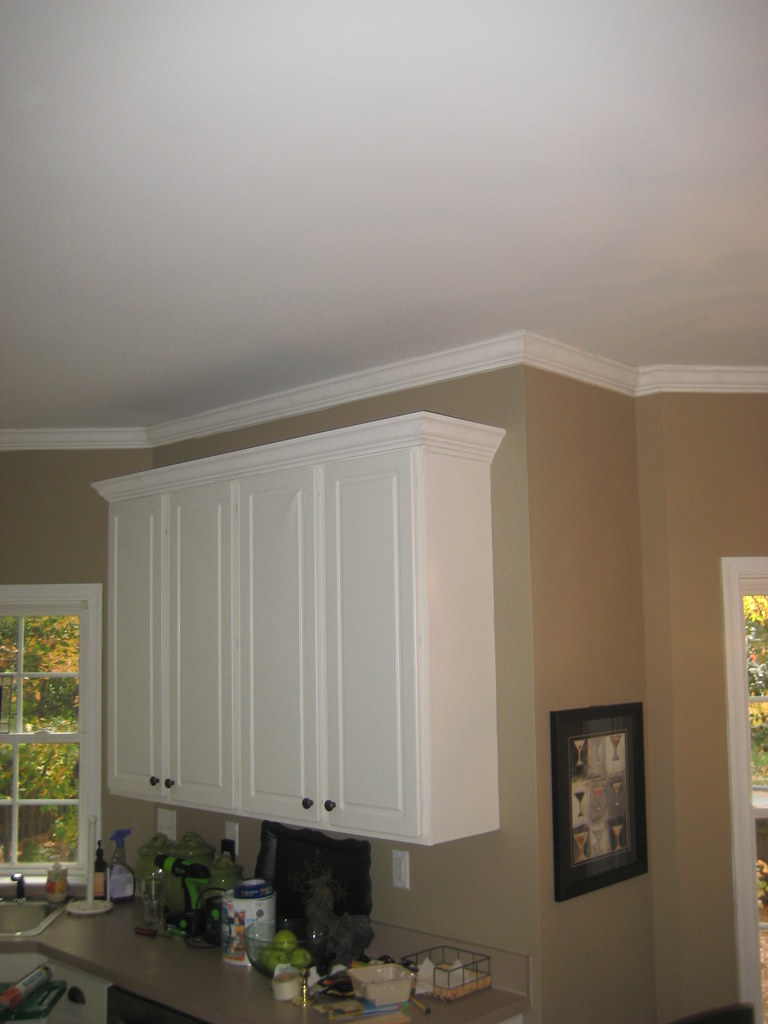
Crown molding is installed at the top of the cabinets, where they meet the ceiling. It adds height and sophistication, making the cabinets look more substantial and elegant. Crown molding can be simple or ornate, depending on the style of the room.
2. Light Rail Molding
Light rail molding is positioned beneath the upper cabinets to hide under-cabinet lighting. This molding improves the aesthetics by providing a finished look and enhances functionality by eliminating glare from the lights.
3. Base Molding
Base molding is attached to the bottom edge of the base cabinets. It serves a protective function by shielding the lower part of the cabinets from scuffs and wear. Additionally, base molding gives the cabinets a more polished appearance by concealing gaps between the cabinets and the floor.
4. Scribe Molding
Scribe molding is a thin strip of wood used to cover gaps between the cabinets and the wall. This molding is beneficial in older homes where walls may not be straight. Scribe molding ensures a clean and seamless transition between the cabinets and the wall.
5. Toe Kick Molding
Toe kick molding is placed at the bottom of base cabinets, covering the recessed area where the cabinet meets the floor. This molding provides a comfortable space for your feet when standing close to the counter and adds a subtle design element to the cabinetry.
6. Applied Molding
Applied molding adds an extra decorative layer to the face of cabinets, doors, or drawer fronts. This type of molding is ideal for creating a more intricate and detailed design, adding character and sophistication to otherwise plain cabinets.
Benefits of Cabinet Molding
Cabinet molding is more than just a decorative element; it offers several practical benefits that make it a valuable addition to any cabinetry project.
Enhancing Cabinets with Proper Molding Installation
Installing cabinet molding is a transformative step in any kitchen or built-in cabinetry project that elevates the finished look with a professional touch. Whether adding decorative trim or crown molding to the tops of cabinets, the key to a successful installation lies in precise measurement and cutting, careful preparation of surfaces, and the right tools for the job. Molding not only bridges the gap between cabinets and the ceiling but also creates a seamless, custom-built appearance that enhances the overall aesthetic of the room. By taking the time to accurately measure lengths, make angled cuts for inside and outside corners, and secure pieces with nails or adhesives, even an intermediate DIYer can achieve results that rival professional carpentry work.
1. Aesthetic Enhancement
One of the primary reasons homeowners choose cabinet molding is to enhance the visual appeal of their cabinets. Molding adds depth, dimension, and a custom look that can make even standard cabinets appear high-end. The suitable molding can also tie together different design elements in a room, creating a cohesive and harmonious look.
2. Seamless Integration
Molding helps cabinets blend seamlessly with the rest of the room by filling gaps and covering transitions. Crown molding, for instance, makes cabinets appear as part of the room’s architecture rather than separate pieces of furniture. This seamless integration enhances the overall design and flow of the space.
3. Concealment of Imperfections
Cabinet molding is excellent for hiding imperfections, such as uneven walls, gaps between the cabinets and ceiling, or misaligned cabinet doors. Scribe molding, in particular, is ideal for covering small gaps and ensuring a smooth, clean line. This concealment can make your cabinets look more professional and well-crafted.
4. Added Protection
Base and toe kick molding protect the lower portions of cabinets from damage caused by daily use, such as scuffs, scratches, and dents. This added protection can extend the life of your cabinets and keep them looking new for longer. Molding also helps prevent dirt and debris from accumulating in hard-to-clean areas.
Choosing the Right Cabinet Molding

Selecting the suitable cabinet molding involves considering various factors, including the style of your kitchen, the height of your ceilings, and your budget. Here are some tips to help you make the best choice:
1. Matching Style and Design
The style of your cabinet molding should complement the overall design of your kitchen or room. For example, a more elaborate crown molding with intricate carvings might be appropriate if you have traditional cabinets with ornate details. On the other hand, if you have modern, minimalist cabinets, sleek and straightforward molding with clean lines would be a better fit.
2. Considering Ceiling Height
The height of your ceilings significantly determines the size and type of molding you should choose. With high ceilings, more extensive crown molding can add drama and draw the eye upward, making the room feel more grand and spacious. Opt for smaller, less bulky molding for lower ceilings to avoid overwhelming the space.
3. Budget Considerations
Cabinet molding comes in a range of prices, depending on the design’s material, size, and complexity. Custom molding can be expensive, so if you’re on a budget, consider stock options or simpler designs. However, keep in mind that investing in quality molding can significantly enhance the look and value of your home.
Cabinet Molding Installation
Proper cabinet molding installation is essential to achieving a polished, professional look. Here are some tips and best practices to ensure successful installation:
Measuring and Planning
Before you begin installation, take precise measurements of your cabinets and the area where the molding will be installed. Planning is crucial to avoid mistakes and ensure a perfect fit. Consider the angles, corners, and obstacles affecting the installation process.
Tools Required
To install cabinet molding, you’ll need a few essential tools:
- Miter saw: This is used to cut the molding at precise angles.
- Nail gun: This is used to secure the molding to the cabinets.
- Level: To ensure the molding is straight and even.
- Measuring tape: For accurate measurements.
- Wood glue: For additional adhesion, if needed.
Step-by-Step Installation Guide
- Cut the Molding: Use a miter saw to cut the molding to the appropriate lengths, accounting for corners and angles.
- Dry Fit: Before securing the molding, dry-fit each piece to ensure it fits correctly. Make any necessary adjustments.
- Apply Adhesive: If needed, apply a small amount of wood glue to the back of the molding for extra adhesion.
- Secure the Molding: Use a nail gun to attach the molding to the cabinets. Make sure the molding is level and aligned correctly.
- Fill Nail Holes: After securing the molding, fill any nail holes with wood filler. Once dry, sand the filler for a smooth finish.
- Touch-Up Paint: If the molding is painted, touch up any areas where the paint may have chipped or where filler was applied.
Advanced Installation Tips for a Professional Cabinet Molding Finish
For achieving a truly professional look in cabinet molding installation, attention to detail is just as important as using the right tools. One key step is to ensure that all cabinet surfaces are clean, dry, and level before beginning the installation, as even small imperfections can affect alignment.
Using painter’s tape to hold molding pieces temporarily in place can help you check positioning before nailing them permanently. It is also recommended to pre-paint or stain the molding before installation to avoid visible brush marks on finished cabinets. Additionally, working slowly at corners and using precise miter cuts ensures tight joints that enhance the overall seamless appearance. Proper spacing, alignment, and finishing techniques can significantly elevate the final result, giving cabinets a high-end, custom-built look.
Maintenance and Care for Cabinet Molding
Proper care and maintenance will keep your cabinet molding looking its best for years. Here are some tips:
Cleaning Tips
- Regular Dusting: Dust your cabinet molding regularly to prevent the buildup of dirt and debris.
- Gentle Cleaning: Use a soft cloth or sponge with mild soap and water to clean the molding. Avoid harsh chemicals that could damage the finish.
- Spot Cleaning: For stubborn stains or spots, use a mixture of water and vinegar or a gentle wood cleaner.
Repairing Damages
Over time, cabinet molding may experience wear and tear. Here’s how to address common issues:
- Scratches: Light scratches can be buffed out with a soft cloth and a small amount of furniture polish or wood filler.
- Dents: Use wood filler to repair dents, then sand and paint to match the rest of the molding.
- Loose Molding: If the molding becomes loose, apply a small amount of wood glue and secure it with a nail gun.
Conclusion
Cabinet molding is a versatile and impactful way to enhance the look of your kitchen cabinets. The suitable molding can make all the difference, whether aiming for a sleek, modern design or a more traditional, ornate appearance. By understanding the different types of cabinet molding and considering your kitchen’s style and dimensions, you can choose the perfect molding to elevate your space.
If you want to read an interesting article about it, explore our “CRAFT AND TOOLS” category.
FAQs
Cabinet molding is decorative trim added to the edges, tops, or bottoms of cabinets to enhance their appearance and provide a finished look. It can also help cover gaps and imperfections where cabinets meet walls or ceilings.
Common types of cabinet molding include crown molding, light rail molding, base molding, scribe molding, toe kick molding, and applied molding. Each type serves a specific function and contributes to the overall aesthetic of the cabinets.
Installing cabinet molding can be a DIY project if you have basic carpentry skills and tools. However, hiring a professional can ensure a better outcome for intricate designs or if you’re unsure about the process.
It improves visual appeal by covering gaps, adding detail, and giving cabinets a more custom and polished finish.
Common types include crown molding, light rail molding, base molding, and decorative trim.