
A crawl space vapor barrier helps stop soil moisture from evaporating into the space beneath your home. That moisture can raise humidity and create conditions that support mold or wood damage. A correctly installed liner also makes future crawl space maintenance cleaner and easier.
A crawl space liner covers exposed soil and limits moisture vapor entering the air above it. For most homes, installation quality matters as much as material thickness. Standing water, plumbing leaks, drainage problems, and uncontrolled humidity still require separate solutions before or alongside the liner.
Crawl Space Vapor Barrier at a Glance
| Question | Practical Answer |
|---|---|
| Main purpose | Reduce moisture vapor moving from exposed soil into the crawl space |
| Common material | Polyethylene or reinforced polyethylene liner |
| Common thicknesses | 6, 10, 12, 16, and 20 mil |
| Good DIY range | Often 10–12 mil reinforced for moderate conditions |
| Higher-durability choice | 16–20 mil reinforced material |
| Code consideration | Local code may require specific coverage, seams, wall attachment, and ventilation |
| DIY difficulty | Moderate to demanding, depending on clearance and obstacles |
| Does it stop flooding? | No; liquid-water problems need drainage or repair first |
The 2024 International Residential Code requires continuous ground coverage for an unvented crawl space. It also specifies sealed or taped joints with at least six inches of overlap. Edges must extend at least six inches up the stem wall and remain attached.
What Does a Crawl Space Vapor Barrier Do Under a House?
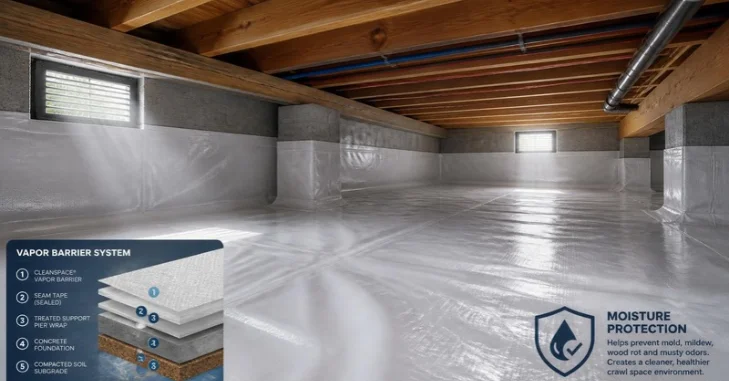
Installing a crawl space vapor barrier is essential because bare earth can continually release moisture into the air beneath a house. The EPA identifies unsealed crawl spaces as common locations for elevated humidity and hidden mold. Covering the soil with a heavy-duty vapor barrier addresses the root source of moisture rather than just treating symptoms upstairs.
That moisture can also affect comfort inside the living space. Humidity, duct conditions, and insulation all influence heating and cooling performance. DreamOfDIY’s guide to home HVAC performance explains how these factors interact.
A liner is not a waterproofing system for active flooding. Water entering through walls, pipes, grading, or groundwater needs another repair. Hiding active water below plastic can make inspection harder later.
What Mil Thickness Should You Choose?
“Mil” describes material thickness rather than millimeters. One mil equals one-thousandth of an inch. A thicker product usually resists tears and punctures better during maintenance.
| Thickness | Typical Use | Durability Consideration |
|---|---|---|
| 6 mil | Basic ground cover | Easier to puncture or shift |
| 10 mil | Light-duty improvement | Better resistance than basic poly |
| 12 mil reinforced | Common DIY upgrade | Good balance of handling and strength |
| 16 mil reinforced | Frequent-access spaces | Stronger against foot traffic and debris |
| 20 mil reinforced | Heavy-duty installations | Useful where long-term durability matters most |
The U.S. Department of Energy recommends at least 6-mil material in its weatherization job guidance. DOE also calls for broad ground coverage and durable sealing around penetrations.
EPA Indoor AirPlus guidance goes further for qualifying new homes. It recommends Class A material and advises a minimum 10-mil thickness for vapor retarders. It also emphasizes ground preparation before installation to prevent punctures.
For a typical DIY project, reinforced 10-mil or 12-mil material is a practical starting point. Choose heavier material when technicians frequently enter the space. Rocky soil and stored equipment can also justify additional durability.
How Much Does a Crawl Space Liner Cost in 2026?
Pricing varies sharply because contractors may quote completely different scopes. A floor-only ground cover costs less than sealed wall attachment. Full encapsulation adds still more work and equipment.
Recent U.S. cost guides commonly place professional barrier projects around $1,000 to $4,500. The final price depends on square footage, liner quality, access, preparation, and wall coverage. Full encapsulation commonly costs more because it addresses the entire moisture-control system.
DIY costs are dominated by liner, seam tape, fasteners, and preparation supplies. Buying extra material is sensible because overlaps and obstacles increase actual coverage needs. Low crawl space clearance can also make a simple project far more labor intensive.
Vapor Barrier Versus Full Crawl Space Encapsulation
These terms are often used as though they mean the same thing. A basic vapor barrier usually focuses on exposed soil. Encapsulation treats the crawl space as a more complete moisture-control system.
Encapsulation may include wall coverage, sealed vents, controlled ventilation, or mechanical dehumidification. The 2024 IRC provides several moisture-management options for qualifying unvented spaces. Those requirements should be checked against locally adopted codes before work begins.
This distinction matters before comparing contractor estimates. Ask whether each quote includes walls, piers, vents, drainage, and humidity management. Two prices can look wildly different because the contractors are pricing different projects.
How to Install a Crawl Space Vapor Barrier
Installation starts with fixing active water problems and preparing the ground. The surface should be free from sharp debris that can damage the liner. EPA guidance specifically recommends removing puncture hazards before installation.
What You’ll Need
- Vapor-retarder liner sized for your crawl space.
- Compatible seam or vapor-barrier tape.
- Utility knife and spare blades.
- Measuring tape.
- Knee pads and protective clothing.
- Work light or headlamp.
- Appropriate wall fasteners or termination materials.
- Compatible sealant where required.
- Respiratory and eye protection for dirty spaces.
1. Inspect for Water Before Covering Anything
Look for standing water, plumbing leaks, wet foundation walls, and drainage problems. Correct those causes before laying plastic across the floor. The liner should control vapor rather than conceal an unresolved leak.
2. Remove Debris and Sharp Objects
Clear scraps, stones, nails, roots, and construction debris from the soil. Smooth obvious high points that could stress the liner. This preparation reduces punctures while you crawl across the material.
3. Measure the Floor and Plan Your Seams
Measure the crawl space instead of using the home’s exterior dimensions alone. Include extra material for overlaps, wall turn-ups, piers, and trimming. Planning seam locations can reduce awkward cuts beneath ducts or plumbing.
4. Lay the First Sections Carefully
Unroll the liner without dragging it across sharp surfaces. Keep each sheet as flat as practical while working outward. Avoid unnecessary cuts because every opening creates another area requiring sealing.
5. Overlap and Seal the Seams
Follow the liner manufacturer’s instructions and applicable local code. The 2024 IRC requires at least six inches of overlap for unvented crawl spaces. Joints in that application must also be sealed or taped.
6. Detail Piers and Penetrations
Cut carefully around support piers, pipes, and other fixed obstacles. Seal vulnerable openings with compatible materials instead of ordinary household tape. Poor detailing around penetrations can undermine otherwise careful work.
7. Secure the Perimeter Where Required
Unvented-space rules require the liner to extend at least six inches up stem walls. The edges must also be attached and sealed under IRC Section R408.3. Local amendments can change requirements, so verify your jurisdiction first.
8. Inspect the Finished Surface
Walk or crawl the completed area and check every seam. Repair punctures, lifted tape, loose edges, and uncovered soil. Record problem areas so future inspections can focus on vulnerable locations.
Common Installation Mistakes
The biggest mistake is installing plastic before controlling liquid water. Ground vapor and flooding are different problems. A liner cannot repair a failed drain, leaking pipe, or poor exterior grading.
Thin material can also fail quickly in frequently accessed spaces. Technicians may kneel, crawl, or place tools directly on the liner. Reinforced material can be a better investment when regular access is expected.
Another mistake is ignoring the rest of the home’s moisture picture. Mold found elsewhere usually requires moisture-source correction rather than surface cleaning alone. DreamOfDIY’s attic mold removal guide explains that same source-first principle.
When Should You Call a Professional?
Consider professional help when the crawl space contains standing water or extensive mold. Structural damage, damaged wiring, sewage, or very low clearance also increase risk. Complex encapsulation systems can require drainage, electrical work, or mechanical humidity control.
A contractor may also be worthwhile when your local code requirements are unclear. Code provisions vary because states and municipalities adopt different editions and amendments. Ask for the exact installation specification before comparing bids.
Homeowners researching related below-grade projects can browse DreamOfDIY’s basement resources. Indoor-air concerns can also extend beyond the crawl space itself. The site’s large-room air purifier guide covers another part of indoor air management.
Frequently Asked Questions
How long does a crawl space vapor barrier last?
Service life depends heavily on material strength and installation conditions. Thin sheeting can tear much sooner in a rocky or frequently accessed space. A reinforced liner usually makes more sense when long-term durability matters.
Is 6-mil plastic enough for a crawl space?
Six-mil material can meet certain minimum applications and DOE guidance starts at that thickness. It remains more vulnerable to punctures than heavier reinforced products. Local codes and the planned crawl-space design should guide the final choice.
Should the plastic go up the crawl space walls?
For an unvented crawl space under the 2024 IRC, the answer is yes. The material must extend at least six inches up the stem wall. It must also be attached and sealed as required by the code.
Will a vapor barrier stop mold?
A liner can reduce one major moisture source from exposed soil. It cannot correct roof leaks, plumbing leaks, condensation, flooding, or uncontrolled indoor humidity. Mold prevention requires controlling the moisture source that supports growth.
Can I install one myself?
Many homeowners can handle a straightforward floor installation with adequate access. Tight spaces, water intrusion, electrical hazards, or extensive sealing can make professional help safer. Always inspect the area before deciding whether the project suits your skills.
The Bottom Line
A good installation begins with moisture diagnosis rather than a roll of plastic. Choose durable material, prepare the soil, seal seams carefully, and follow local code requirements. Treat drainage and humidity problems separately when the conditions demand it.
Start by inspecting your crawl space during dry weather and after heavy rain. Those two inspections can reveal whether you face vapor, liquid water, or both. Once you know the source, you can choose a liner-only project or a broader moisture-control plan.