
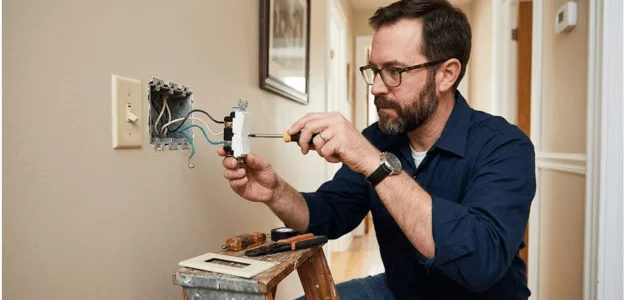
Learning how to replace a light switch can save time on a simple, like-for-like home repair. This guide covers a basic 120-volt single-pole mechanical switch in a typical U.S. wall box. It does not cover new circuits, panel work, damaged wiring, or uncertain multiway systems.
Quick answer: Shut off the correct breaker, then verify the circuit is de-energized with a properly rated tester. Photograph the existing connections before disconnecting anything, then transfer each conductor to the matching terminal on the new device. Reinstall the device, restore power, and test it. Stop if anything looks burned, damaged, aluminum, or unfamiliar.
| Project detail | What to expect |
|---|---|
| Scope | Like-for-like replacement of a basic single-pole mechanical switch |
| Typical time | About 20–30 minutes for a straightforward replacement |
| Skill level | Basic DIY skills with careful electrical-safety practices |
| Essential safety tool | Properly rated voltage tester |
| Main tools | Screwdrivers, pliers, flashlight, and wire stripper if needed |
| Stop immediately if | Wiring is burned, damaged, aluminum, unidentified, or still energized |
Key Takeaways
- Shut off the circuit breaker, not only the wall control.
- Verify the circuit is de-energized before touching any conductor.
- Buy the same device type and appropriate electrical rating.
- Photograph and label the existing connections before disconnecting them.
- Follow the replacement device’s terminal markings and instructions.
- Stop when the wiring differs from the expected simple configuration.
Before You Start: Confirm This Is a Simple Replacement
This project is intended for a like-for-like replacement inside an existing electrical box. Local permit and electrical-code requirements can vary across the United States. OSHA’s electrical safety guidance treats de-energizing a circuit and verifying it as the basis of safe electrical work.
Identify the existing device before buying its replacement. A single-pole switch controls a fixture from one location and normally has two switching terminals plus ground. A three-way setup controls a fixture from two locations and includes a common terminal plus two travelers.
What You’ll Need
- A replacement device that matches the existing type and has the appropriate electrical rating.
- Properly rated voltage tester you know how to use.
- Flat-head and Phillips screwdrivers.
- Needle-nose pliers.
- Wire stripper, if you need to prepare conductor ends.
- Flashlight or headlamp.
- Painter’s tape or wire labels.
- Phone camera for documenting the original connections.
Choose a replacement intended for your circuit voltage and connected load. Smart controls may require a neutral that a traditional mechanical device does not use. Check the manufacturer’s exact instructions before disconnecting any conductor.
Should You DIY This Job? A Quick Decision Check
| Proceed only when | Stop and call an electrician when |
|---|---|
| The existing device is a basic single-pole model | You cannot identify the correct breaker |
| The insulation appears intact | Any conductor still tests energized |
| The wiring is copper and clearly identified | You find aluminum or brittle cloth-covered wiring |
| The new device matches the old configuration | You see scorching, melting, or damaged insulation |
| You can verify the circuit is de-energized | The box contains an unfamiliar multiway configuration |
| The electrical box is secure | The box or wiring is loose, damaged, or overcrowded |
This check helps prevent guesswork before you move any conductor. ESFI recommends staying within your skill level and using qualified help when necessary. A simple repair never warrants working on a circuit you cannot prove is de-energized. For other projects that suit your skill level, browse Dream of DIY’s Renovation section.
How to Replace a Light Switch in 7 Steps
- Turn off the correct circuit breaker. Turn on the controlled fixture, then locate its breaker. Switch that breaker off and mark it so nobody restores power accidentally.
- Verify the circuit is de-energized. Use a properly rated tester and follow its instructions before touching conductors. Stop immediately if the tester indicates voltage.
- Remove the wall plate and existing device. Unscrew the plate and mounting screws after completing the safety check. Gently pull the device forward without tugging its conductors.
- Photograph and label every existing connection. Take a clear picture showing each conductor and terminal before loosening anything. Mark any common terminal or unusual connection before proceeding.
- Transfer the conductors to the replacement device. Move each connection according to the new device’s markings and instructions. Connect the grounding conductor to the grounding terminal when required. Do not disturb unrelated wire bundles you do not understand.
- Mount the new device and reinstall the plate. Fold the conductors carefully into the box without pinching their insulation. Tighten terminals and mounting hardware according to the manufacturer’s specifications.
- Restore power and test operation. Reinstall the wall plate before turning the breaker back on. Switch the fixture several times and watch for abnormal behavior. Turn the breaker off if you notice heat, buzzing, sparks, or repeated tripping.
These steps follow the same core safety sequence used by current homeowner guides and manufacturer instructions. The essential rule is simple: isolate the circuit and verify it before handling wiring. Never substitute the wall control’s off position for proper circuit isolation.
What the Wires and Terminals Mean
A basic single-pole mechanical switch interrupts the ungrounded conductor supplying the controlled fixture. It normally has two current-carrying terminals and a green grounding terminal. Many basic models let you switch the conductor on either main terminal, but always follow the supplied instructions.
Do not identify conductors by insulation color alone. Older wiring, switch loops, and past repairs can produce unexpected colors or markings. Record terminal positions before disconnecting anything, especially when you find a different-colored common terminal.
Neutral conductors often remain bundled behind traditional mechanical controls. Some electronic and smart devices need a neutral connection for their internal electronics. Never use the grounding conductor as a substitute neutral or alter an unfamiliar bundle.
Common Mistakes to Avoid
Most post-replacement problems involve incorrect identification, loose connections, or a mismatched device. Those errors can also cause nuisance tripping, unreliable operation, or unwanted heat. Use your wiring photo and manufacturer markings instead of relying on memory.
- Trusting the wall control instead of shutting off the breaker.
- Skipping the voltage verification step.
- Replacing a three-way device with a single-pole model.
- Disconnecting neutral bundles that were not attached to the old device.
- Leaving a required grounding connection incomplete.
- Using push-in terminals without checking permitted conductor size and type.
- Ignoring the manufacturer’s terminal-tightening requirements.
- Pinching insulation while forcing the device into the box.
If the breaker trips after the repair, turn it off immediately. Do not repeatedly reset it while guessing at the cause. Repeated tripping can indicate an incorrect connection, short circuit, or damaged conductor.
When to Call a Licensed Electrician
Stop when the project no longer resembles a straightforward device swap. Burned insulation, melted plastic, unusual heat, buzzing, and repeated breaker trips require proper diagnosis. Aluminum wiring, deteriorated insulation, or uncertain grounding also deserve professional attention.
Call an electrician when you find any of the following.
- Aluminum, brittle, or badly deteriorated conductors.
- Burned terminals, melted insulation, or scorch marks.
- A box that remains energized after the expected breaker is off.
- More than one circuit entering a box you cannot safely identify.
- Three-way or four-way wiring you cannot confidently document.
- A damaged, loose, or severely overcrowded electrical box.
- A smart control requiring connections unavailable in the existing box.
- Breaker trips, unusual heat, sparks, or buzzing after replacement.
Professional help is also sensible when one fixture has controls at several locations. Multi-gang boxes may contain conductors supplied by more than one circuit. Stop if switching off one breaker does not de-energize every relevant conductor.
Finish the Wall and Clean Up
The replacement should sit straight and flush without forcing the wall plate into position. If the old plate exposed damaged gypsum, repair the wall before applying your final paint. Dream of DIY’s drywall tape and mud guide covers larger surface repairs around finished walls.
Keep the area around electrical controls clean and free from loose cables. For a separate cable-management project, see these TV cord organization ideas.
Frequently Asked Questions
Can I replace a light switch myself?
A careful homeowner may handle a straightforward single-pole replacement where local rules permit DIY electrical work. Shut off the breaker and verify the circuit is de-energized before touching conductors. Stop if the wiring, box, or device type does not match this guide.
Do I need a neutral wire for a basic replacement?
A traditional mechanical single-pole device usually does not require a neutral connection. Neutral conductors may still be present as a capped bundle inside the box. Some smart or electronic controls require a neutral, so check the exact model instructions.
Does it matter which wire goes on each terminal?
It depends on the device you’re installing. Many simple mechanical single-pole models have interchangeable main switching terminals. Three-way and electronic devices can have specific common, line, load, traveler, or neutral terminals.
How long does a basic replacement take?
A straightforward replacement commonly takes about 20 to 30 minutes when the existing wiring is accessible. First-time DIYers should allow extra time for identification and careful safety checks. Never rush voltage testing or conductor identification to meet a time estimate.
What should I do if the new switch does not work?
Turn the breaker off before inspecting anything inside the box again. Compare every connection with your original photograph and the manufacturer’s wiring instructions. Call an electrician if the connections appear correct but the circuit still behaves abnormally.
Can I install a dimmer or smart control instead?
You can upgrade only when the new device matches the circuit and connected lighting load. LED dimmers also need compatible lamps, while some smart models require neutral conductors. Follow that product’s wiring diagram rather than treating it as a direct mechanical replacement.
Your Next Step
Gather the correct replacement device and testing equipment before shutting down the circuit. Keep the breaker off until every connection is secure and you reinstall the wall plate. If the existing wiring differs from this guide, stop and contact a licensed electrician.